Getting your printer to print correctly on thick paper and card can sometimes feel frustrating. You may be experiencing jams, double images or toner just rubs off the page when you touch it.
If you notice that these issues only occur when you use something other than your plain 80gsm paper, the chances are that a simple setting change could solve your problems.
Why do I need to change settings?
Unlike inkjet printing, laser printing uses heat to bond the toner to the paper. This requires users to tell the printer about the type of paper being used to achieve the best results.
When a thicker paper is specified, the printer will automatically adjust its speed and temperature so that the toner has the perfect conditions to bond to the paper. You should be able to see that the printing exits the machine at a much slower speed than usual.
Types of cardstock and thick paper available…
Any paper or card stock being used in a laser printer must state that it is suitable for a laser printer. This is because some inkjet-specific papers have coatings which will melt when heat is applied, which could cause damage to a laser printer.
There are many types of paper or printing stock available for laser printers. Here are some examples:
- Thick paper (most devices allow up to 300gsm)
- Card
- Transparency Sheets
- Labels – (Never use a partial sheet of labels – full sheets only please!)
- Glossy paper
- Backlit display paper
- Envelopes
Once you have the correct type of stock, you need to tell the printer. Here’s how…
How to set paper type on your printer
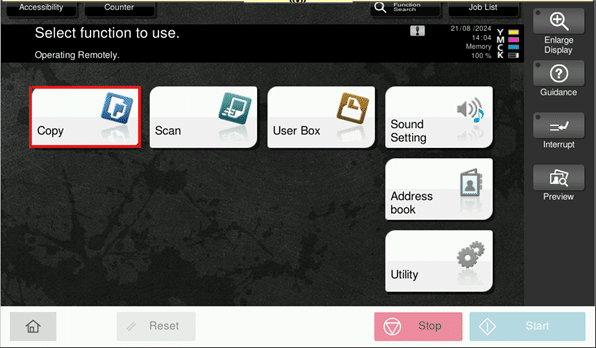
- Select ‘Copy’ mode on the printer’s touch screen.
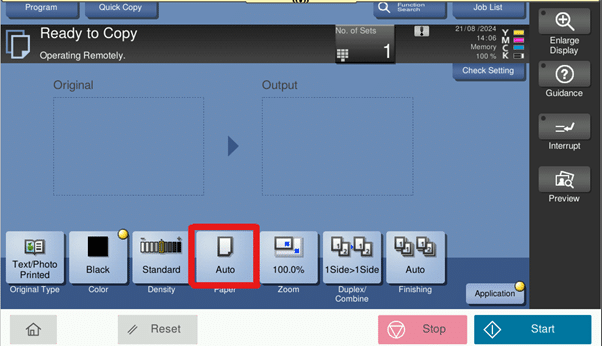
- Select ‘Paper’ from the bottom of the copy screen.
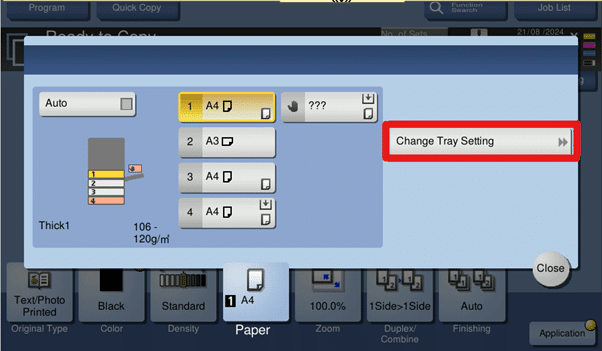
- Highlight the paper tray that contains your thick paper or card and press ‘Change Tray Setting’.
- From the left side of the panel, choose the relevant ‘Paper Type’.
The top right of the screen should show a paper weight which now matches your desired paper stock.
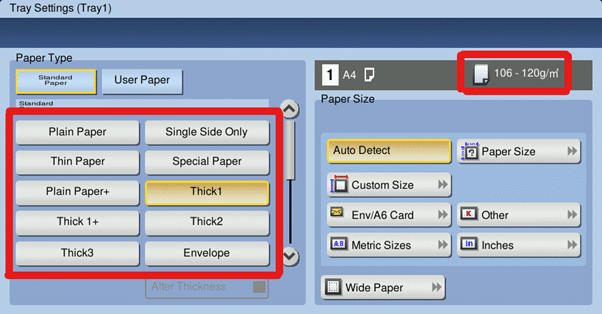
#TIP – If you’re unsure which thickness setting to go for, use the thickest available (in this example ‘Thick 3’). This will be slightly slower but give a better finish.
How to set paper type on your computer
Now that you have your printer configured, you just need to send your print using the matching settings.
For a Windows PC
- Choose File > Print then click ‘Printer Properties’.
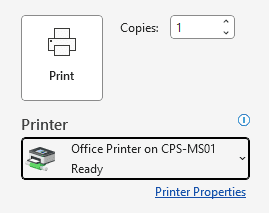
- Under the ‘Basic’ tab, make sure that the ‘Paper Tray’ and ‘Paper Type’ match the printer settings.
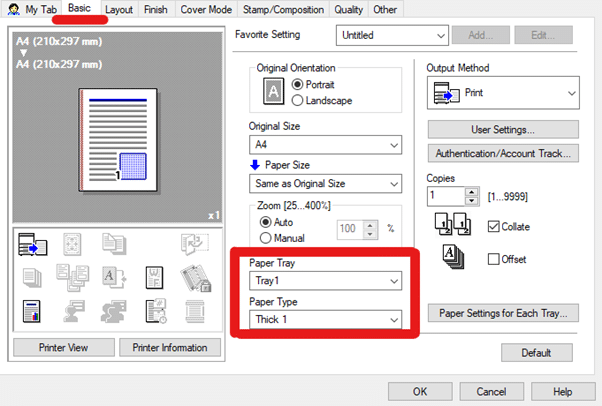
You can now go ahead and print!
If you are a Mac user, here is how to set your paper type:
- With a document open on your Mac, choose File > Print.
- Scroll down in the Print dialog and click ‘Paper Tray / Output Tray’.
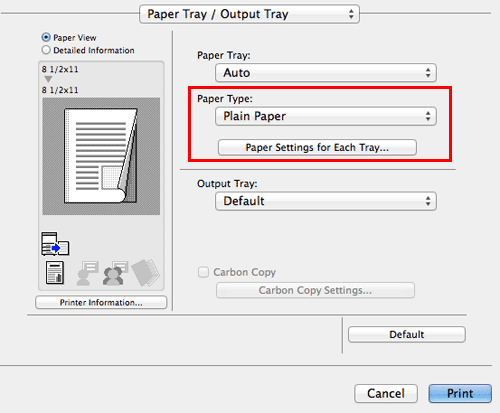
- Set ‘Paper Tray’ and ‘Paper Type’ to match the settings of the printer.
- Click ‘Print’
Well done! You should now have successfully printed on your new paper stock.
If you are struggling with getting the best from your printer, get in touch with us here. We would love to help you out.

