What is Scan to Email?
Whilst setting up scan to email may initially seem like a daunting task to someone who may not consider themselves to be very technical, we are going to show that the process of configuring scan-to-email is actually quite straightforward.
Firstly, a bit of technical jargon… How does email scanning work?
The service which we are going to use to send email across the web is called SMTP which stands for Simple Mail Transfer Protocol. This protocol is built-in as standard to most modern business multifunction devices including all Konica Minolta & Develop office devices.
The scanner utilises a SMTP server to send the email via the internet to a POP/IMAP server which receives the email and delivers it to the recipient.

Setting up Scan to Email
OK, enough of the boring stuff! How do we set this up??
Well, you are going to need 6 key pieces of information about your email server:
-
- Server Address – mail.example.com or server ip address
-
- SSL/TLS Setting – SSL, STARTTLS or None
-
- Port No. – This depends on which security setting is used
-
- User ID / Email Account – user@example.com
-
- Password – password created for User ID / email account
-
- Sender Address – Usually the same as account login
You may already have access to this info. If so, great. If not, don’t worry…
The first 3 settings can usually be found with a quick google search “Office 365 SMTP Settings” or “what are the SMTP settings for yahoo”.
The last 3 settings will have been created specifically for you or your company so hopefully someone has made a note of them somewhere…
Now that we have those pieces of information, we can setup the Konica MFD.
Configuring the device
Let’s begin by accessing the printer web page by inputting the printer IP Address into a web browser address bar then logging into the Administrator screen. You can find out how to do that here.
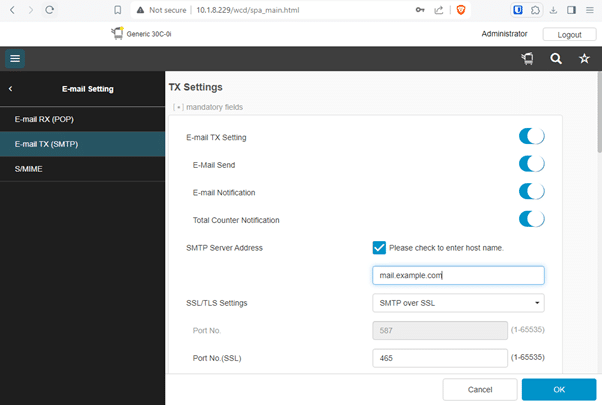
Once you are logged into the Administrator screen, you will need to use the left menu panel to head for Network>Email Setting>Email TX (SMTP)

Here you will find the boxes to input SMTP Server Address, SSL/TLS Settings & Port No. You can now input those settings for your email server.
Further down the page you will see User ID & Password under the SMTP Authentication setting. You may need to turn SMTP Authentication on if it isn’t already.

Hold tight, we are nearly there now!
The last setting we need to input is the sender address. This is the address that will show when the scan lands in your inbox so choose wisely. A generic ‘scans@’ or ‘info@’ usually works best. For best results this does need to be a valid email address.
Head over to System Settings>Machine Setting to find Administrator Email Address & Machine Email Address. You will need to input the sender address into both boxes.


Congratulations! You just set up scan-to-email! Go on, give yourself a pat on the back.
You can now add some email addresses to the device address book and start sending all those important documents.
If you run into any issues along the way, why not give us a call and see if we can help you out.

